This is to install Docker within Ubuntu WSL without using the Windows Docker application.
Follow the below steps.
Install Ubuntu 22.04 WSL
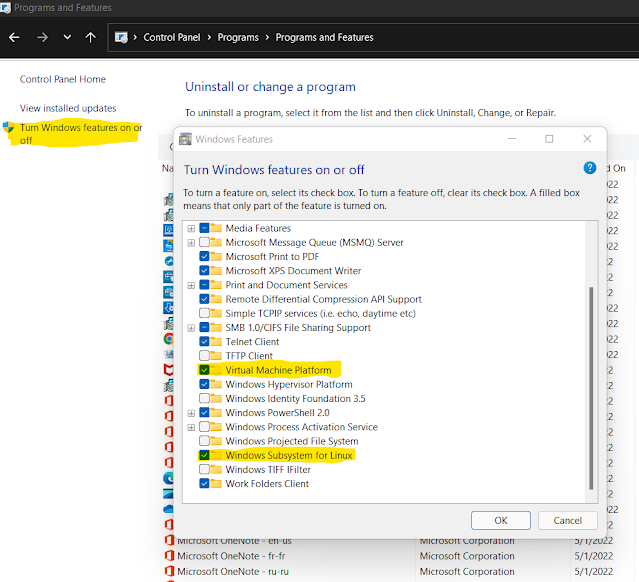
1. Enable Windows Subsystem for Linux and Virtual Machine platform
Go to Control Panel -> Programs -> Programs and Features -> Turn Windows features on or off
Open Powershell and type in the below command.
wsl --set-default-version 2
If you don't have WSL 2, download the latest WSL 2 package and install it.
3. Install Ubuntu
Open Microsoft Store and search for Ubuntu. Select the version you intend to install. I'd use the latest LTS version Ubuntu 22.04. Click on the Get button.
4. Open up the installed Ubuntu version that was installed.
If you get an error like the below image, make sure to install the WSL2 Kernel update.
If it's an older Ubuntu version the error message would be something like the image below.
Installing the WSL2 kernel update should fix this issue. Then close the Ubuntu window and open it up again.
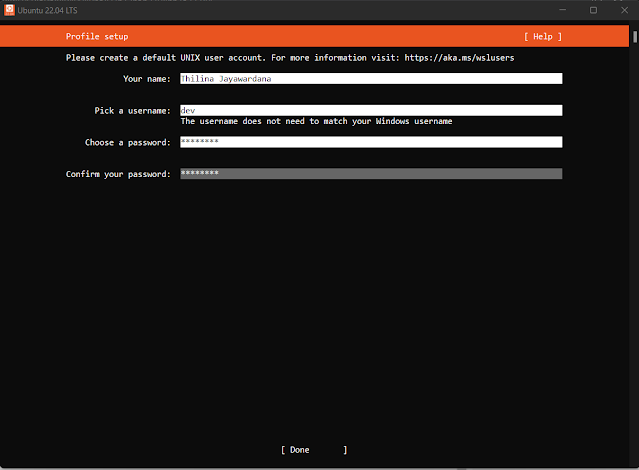
It will ask for the Language, username, and password like below.
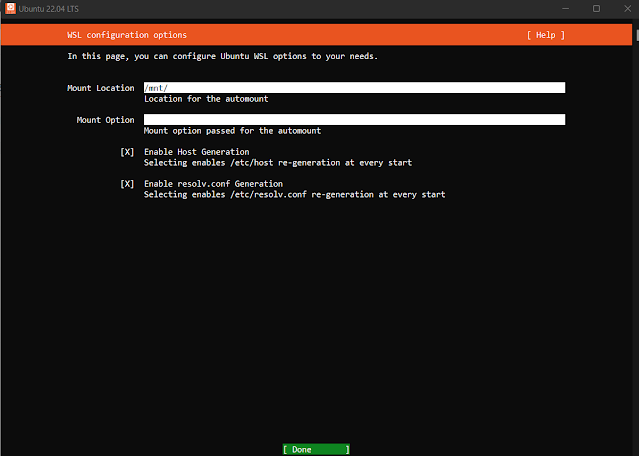
In the mount settings, you can leave the defaults.
Hit enter to reboot Ubuntu WSL.
Now, we have installed the WSL 2.
Install Docker within Ubuntu WSL
Time to install Docker, same following steps are mentioned in the official Docker documentation.
5. Run the apt update command to get the updated and install some required packages.
sudo apt-get update
sudo apt-get install \
ca-certificates \
curl \
gnupg \
lsb-release
6. Add CPG keys for the official docker repository.
curl -fsSL https://download.docker.com/linux/ubuntu/gpg | sudo gpg --dearmor -o /usr/share/keyrings/docker-archive-keyring.gpg
7. Add Docker repository to APT.
echo \
"deb [arch=$(dpkg --print-architecture) signed-by=/usr/share/keyrings/docker-archive-keyring.gpg] https://download.docker.com/linux/ubuntu \
$(lsb_release -cs) stable" | sudo tee /etc/apt/sources.list.d/docker.list > /dev/null
8. Install Docker
sudo apt-get update
sudo apt-get install docker-ce docker-ce-cli containerd.io docker-compose-plugin
9. Start the docker service
sudo service docker start
10. Check the docker service status
sudo service docker status
If it is Ubuntu 22.04, then it might have an issue with the iptables version. When you are checking the status, it might still show up not running. If that is the case, make sure to switch the iptables to legacy.
Run the below command to change the default iptables version.
sudo update-alternatives --config iptables
Then start the docker service again by repeating step 9 above.
11. Add the user to the docker user group.
sudo usermod -aG docker ${USER}
su - ${USER}
12. Now, that everything is complete, feel free to use docker!
docker ps
Issues and troubleshooting
If you still can't run the docker service, check the WSL version in Powershell.
wsl -l -v
If you have version 1, WSL 1 did not support running Docker within the Ubuntu subsystem on its own. The WSL 1 required to use Windows Desktop Docker app to be installed and use windows binaries to run Docker within WSL. This is great if you need to keep the 2 docker services in sync.
If you want to run Docker within WSL without having the windows Docker client, you have to update it to WSL2.
I would uninstall the current Ubuntu installation from Settings -> Apps -> Ubuntu.
Then switch the WSL version as per step 2 above, then install the Ubuntu again.


Instructions worked, thank you!
ReplyDelete