Ubuntu Linux useradd vs adduser which is the easier command?

There are two main commands in Ubuntu for creating users. I've found them confusing and I always forget which to use when. So, thought to write them down clearly as a quick reference.

TLDR;

adduser - Interactive tool, creates home directory and prompts for password and more details.

useradd - A low level tool to creat a user. Doesn't create home dir if not specified. Use passwd command to add/change password for the user.


Easier Command

adduser

If you want to create a typical user for Ubuntu, just use "adduser" command. This is an interactive high level tool which will take in username, and more details including password. It will create the home directories as well.

adduser <username>


adduser command


You can simply use this to add a user to a specific group also.

adduser <username> <group name>


adduser to a group


Not so easier commands

useradd

This ia low level tool which would create the user. Home directory is not created unless specified.

useradd <username>


useradd

useradd with home directory

useradd -m <username>

useradd with home dir


Add user to a group 

In oder to add user to a group, you can also use usermod command.

sudo usermod -aG <group name> <username>

usermod

Also this can be use for various user modifications like changing the home directory etc. Refer the man pages for more details.


passwd

This can be used to set a password or change a password to a user.

passwd <username>

passwd

Delete a user

You can use deluser command to delete a user. 

deluser <username>

delete user

Notice that home directory still exists even after deleting the user.

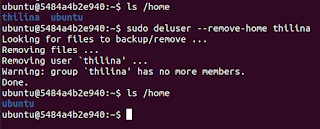
If it requires to delete the home directory, you can use --remove-home flag.

deluser --remove-home <username>

deluser remove home


All in all, adduser command is a highlevel interactive tool which can do same thing as using combinations of multiple low level commands. Even though useradd command is a low level tool, this is much useful if you need to create system users with various requirements. You can even set an expiration for a user with this command. Check out the command man page for more details.


Comments

Popular posts from this blog

Java, how to create a list with a single element

 I wanted to create a Java List with a single element. Yet, I wanted to add more elements later. So, I was looking for a couple of ways to do this. So far there are multiple elegant ways to create a list with a single element with a one-liner. Not so much for a modifiable list though. Here's what I gathered so far. Followings are a few ways of creating a list with strictly a single entry. Can't add more elements. 1. Collections.singletonList() This returns an immutable list that cannot be modified or add more elements. // An immutable list containing only the specified object. List<String> oneEntryList = Collections. singletonList ( "one" ) ; oneEntryList.add( "two" ) ; // throws UnsupportedOperationException 2.  Arrays.asList() This returns a fixed-size list consisting of the number of elements provided as arguments. The number of elements provided would be an array hence the size is fixed to the length of the array. // Returns a fixed-size list List...

Ubuntu DNS issue fix DNS_PROBE_FINISHED_BAD_CONFIG

Issue  I've been playing with a VPN and somehow it messed up my DNS resolution configurations. Chrome gives  DNS_PROBE_FINISHED_BAD_CONFIG  error and can't ping google. So it seemed to be an issue with the DNS. Of course, restarting didn't fix it. I tried DNS lookup which gave me below. To make sure this is somehting to do with my DNS confgis, I ran the same by providing the google DNS servers.  It works, which means my default DNS is not working for some reason. To make sure this, ran the below command. systemd-resolve --status Output has an entry for DNS Servers, which was  ::1 Fix 1. Edit the file /etc/systemd/resolved.conf. sudo vi /etc/systemd/resolved.conf 2. Add new DNS entries. I added 2 google DNS and the cloudflare DNS sever. [Resolve] DNS=8.8.8.8 8.8.4.4 1.1.1.1 3. Restart the systemd-resolved and check the configuration is persisted in /run/systemd/resolve/resolv.conf file. sudo service systemd-resolved restart cat /run/systemd/resolve/resolv.co...

Install Docker on Windows 11 with WSL Ubuntu 22.04

This is to install Docker within Ubuntu WSL without using the Windows Docker application. Follow the below steps. Install Ubuntu 22.04 WSL 1. Enable Windows Subsystem for Linux and Virtual Machine platform Go to Control Panel -> Programs -> Programs and Features -> Turn Windows features on or off 2. Switch to WSL 2 Open Powershell and type in the below command. wsl --set-default-version 2 If you don't have WSL 2, download the latest WSL 2 package and install it.  3. Install Ubuntu Open Microsoft Store and search for Ubuntu. Select the version you intend to install. I'd use the latest LTS version Ubuntu 22.04. Click on the Get button. It will take a couple of minutes to download and install. 4. Open up the installed Ubuntu version that was installed. If you get an error like the below image, make sure to install the WSL2 Kernel update .  If it's an older Ubuntu version the error message would be something like the image below. Error: WSL 2 requires an update to its ...